Concrete floors are a common substrate for shower bases, but they can be tricky to install, and there’s a lot you should know before digging up your bathroom floor to install a shower.
This guide will show you how to install a shower base on a concrete floor, so you can get your new shower up and running as quickly and easily as possible.

Can I Install Shower Base by Myself?
Yes, you can install a shower base on a concrete floor without the assistance of a professional. But first, you must be confident that you know what you’re doing.
So, whether you’re remodeling your bathroom to install a new shower where there wasn’t one before, replace a damaged shower pan, or convert your bathtub to a shower, you’ll need basic plumbing skills to complete this project on your own.
Otherwise, I recommend hiring a professional to install it to avoid damaging your shower pan, bathtub, or bathroom itself.
Also, you’ll need to get all of the necessary tools ready, a weekend to spare, and the basic installation steps outlined below.
Shower Base or Shower Pan; Which One Are You Installing?
Again, it’s important to know what you’re installing: a shower base or a shower tray. While these terms are frequently used interchangeably, they refer to different materials, serve different purposes, and require different construction.
A shower base refers to the components that are built on the subfloor to provide structure for the shower. It is typically built with a cement-sand mix, any type of mortar, and drainage pipes. And the installation is usually more technical and difficult to set up.
On the other hand, the shower pan is a single piece of material that sits on top of the shower base and is what you stand on while showering. The shower pan can be made from various materials, such as acrylic, metal, stone, ceramic, or fiberglass. And the installation is quite easy compared to the shower base.
Also, the shower base is an essential component of any shower installation. It is installed beneath a tiled shower floor or shower tray. And its primary function is to allow water to flow freely into the drain. But, the shower tray is not required in every shower installation but is used to add comfort and luxury to the bathroom shower.
In most cases, when people talk about installing a shower base on a concrete floor, they refer to installing a shower tray. But don’t worry. This guide has all the information you need to build whatever you’re installing on your bathroom floor, whether it’s a mortar shower base or a shower tray.
6 Steps to Install Shower Base on Concrete Floor
There is no one-size-fits-all method for installing a shower base. You can use a raised, recessed, or ready-to-tile base, depending on the size of your bathroom, the existing drainage pipe, the type of shower tray you’re using, and how well you can maintain your shower base.
Tools and Materials Needed
- Shower pan
- Tape measure
- Drain fitting kit
- Pencil
- Sand, mortar, and water
- Chisel or Power drill
- Flexible pipes and siphon
- Brush and gloves
- Screws
- Screwdriver
- Level
- Silicone sealant
Step-1: Prepare the ground
Before beginning the installation process, ensure the concrete floor is clean and level.
- Remove any dirt or debris on the floor.
- Create a level surface on your concrete floor with a leveling compound.
- Examine the shower tray for dents or other damage.
Step 2: Take Measurements
The next step will be to take accurate measurements of the area where the shower base will be installed.
- Lay the shower tray on the floor and draw a line around it. This line will provide you with a visual representation of the installation area when applying the mortar base.
- Next, measure and mark the drain spot on the subfloor with a tape measure and a pencil.
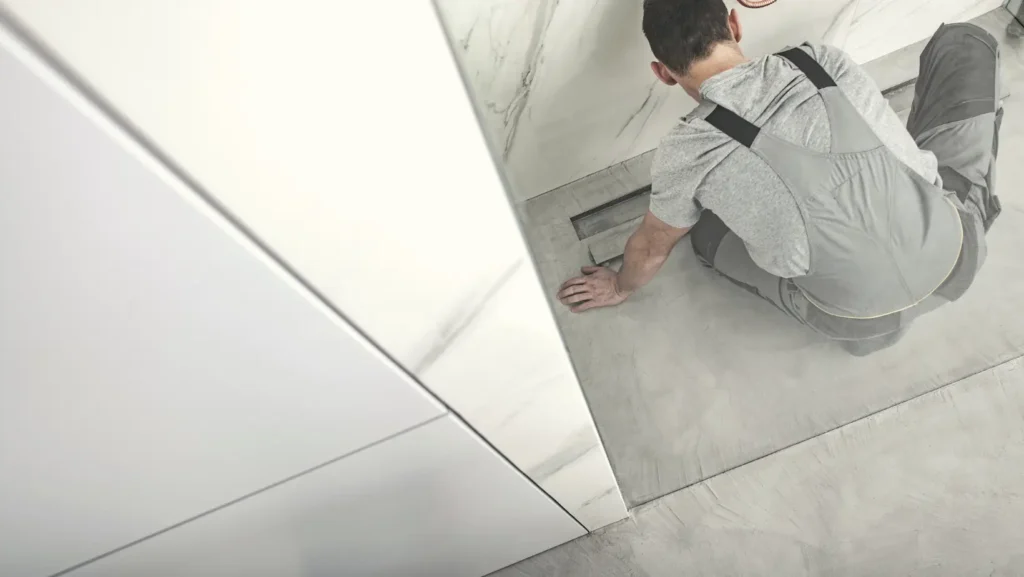
Step 3: Cut out the Floor
After taking measurements, cut out the drainage line on the concrete floor.
- Place the chisel or drill on the concrete and lightly cut out the area marked with a pencil.
- The location of the drainage line determines the depth at which you cut the floor. If an existing drainage pipe is above ground, you should consider installing a raised shower base.
- If there is no existing pipe, remove enough concrete from the floor to allow for drainage pipe installation.
- Ensure that the hole you make is not too large or too small than the drain itself.
Step 4: Install the Shower Drain
The next step is to install the drainage pipe, assemble the shower drain fittings, and connect them.
- Run a pipe from the drainage line to the sewerage system.
- To ensure smooth water drainage, lay the drain pipe on a slope line equal to the top of the floor.
- Use mortar to hold the drain in place.
- Next, unbox the shower drain fittings and assemble them.
- Install the drain fittings on the shower tray and the drainage pipe according to the instructions on the pack.
- To test if the drainage hole on the tray aligns with the pipe on the ground, place the shower tray on the floor and pour water on it.
- Remove the tray and inspect the water drops for signs of leaks.
Step 5: Construct Mortar Base
Now that the drainage has been properly installed, it’s time to build your shower base.
- Use sand, cement, and water to make your mortar mix.
- Using a trowel, apply a layer of mortar to the concrete floor, completely covering the area where the shower tray will be installed.
- Ensure that the mortar is applied as evenly as possible. I recommend using quick cement for a faster installation.
Step 6: Secure the Shower Tray to the Mortar Base
This is the final step for installing a raised or recessed shower base using a shower tray.
- Place the pan over the mortar, and press it firmly.
- Using a leveling tool, ensure the shower pan is level on all sides.
- Test the drain once again by pouring water on the shower tray. Observe the drain spot for leaks.
- Secure the shower tray into place using screws.
- Once the shower base is in place, use silicone to seal the space between the shower tray and the wall panels.
- Allow the mortar to dry for 24 hours before using the shower or installing the enclosure.
If you are installing a ready-to-tile base, simply install your bathroom tile on the mortar base for a walk-in shower.
FAQs On How To Install Shower Base On Concrete Floor
Do You Need to Waterproof Under a Shower Base?
Waterproofing the shower pan is unnecessary, especially when constructed on a concrete base. But if the shower base is made of acrylic or tile, the layer beneath it must be waterproofed. In addition, the walls surrounding the shower base must be waterproofed. Simply apply a silicone seal around the perimeter of the shower tray and wall to prevent water leaks.
How Long do Shower Pans Last?
Shower pans are made of durable materials such as porcelain, ceramic, fiberglass, or plastic and can last 10 to 15 years before they start to degrade.
Can I Install a Shower Tray on the Floor Tiles?
It is not advisable to tile beneath the shower tray. A tiled floor can cause an uneven shower installation and breakage of the shower tray. Installing a shower tray on a tiled floor can also cause damage to the tile. According to some experts, having tile under your shower base can also serve as a breeding ground for mold and mildew. Rather, mortars work best beneath your shower base. They make a smooth surface for placing the shower tray and keep it from slipping and breaking.